(mechanical engineer + musician + human factors designer)
* (cello + drums)
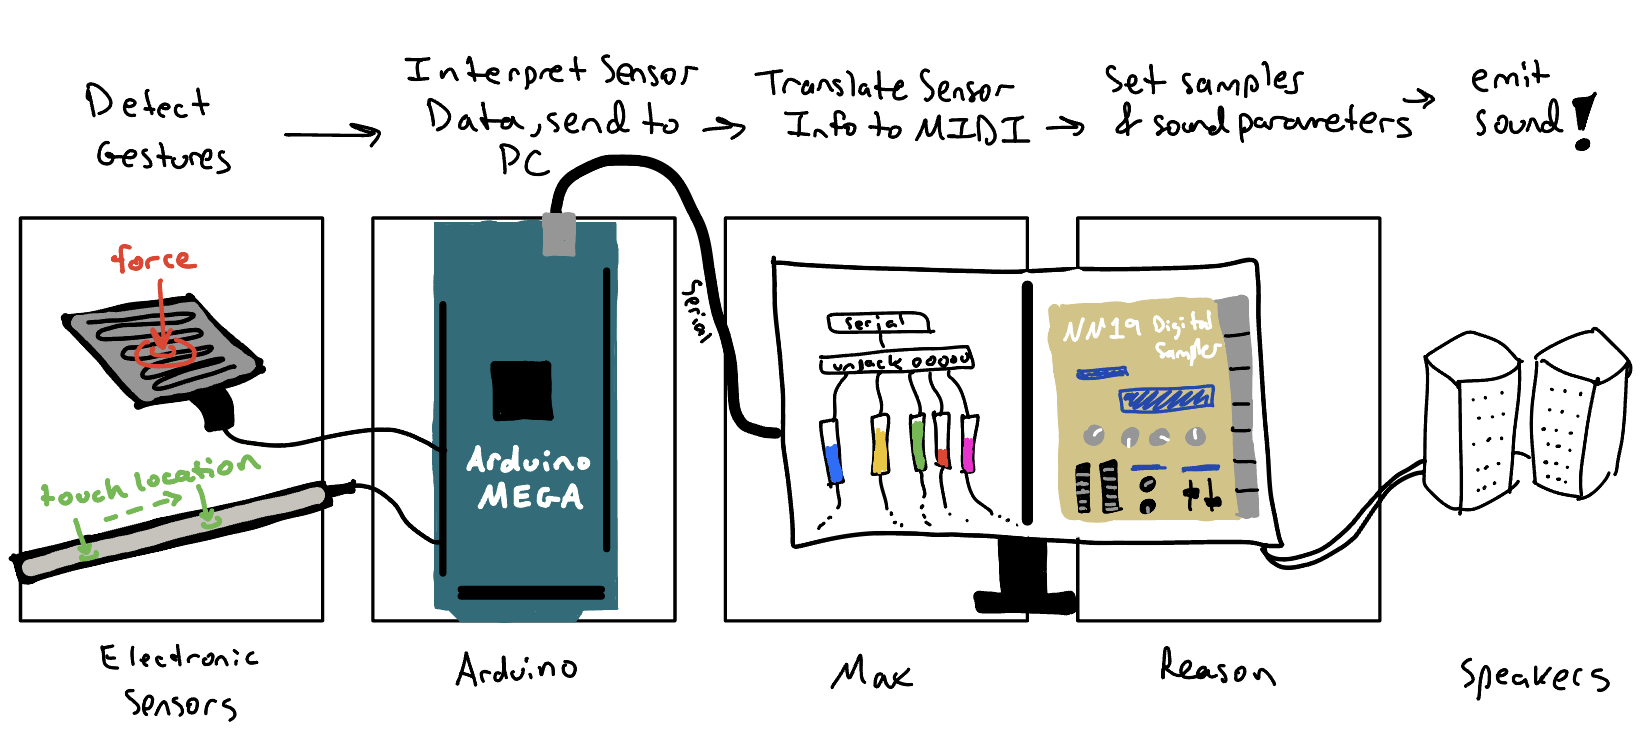
* (sensors + Arduino + Max MSP + Reason)
= a functional, virtuosic, LED-reactive electronic musical instrument
Check out this video for a live demonstration of the instrument, along with the full report I wrote for the course below.
Rose Kitz
Group: Kyle Tomlinson and Ramona Xi
EMID ES95, Prof. Lehrman
12/19/23
Design Goals & Features
Kyle’s frustrations with the physical limitations of the acoustic cello and drums he plays and desire to enhance those acoustic sounds with digital effects inspired this multi-faceted instrument. While imitating the cello and drums in physical form and beginning sounds, we aimed create an instrument that is fun and easy to learn with sonic possibilities beyond acoustic instruments, all in a travel-size form factor while playable by one person alone or a group in a variety of familiar instrument orientations. The simplicity and familiarity of the interface allow anyone to pickup the instrument quickly, while also the variety of sound and musical parameter options enable experienced string instrument or drum players like Kyle to experiment with new sounds without having to learn how to play a completely new instrument.
To meet these design goals, we determined the following features:
| Design Goal | Features |
| Familiar like existing instruments | - Adjust pitch on a sliding scale based on finger position (i.e. a cello string) - Trigger notes and resulting volume with ‘hittable’ pads (i.e. drum kit) |
| Easy to learn (for anyone) and fun to play | - Visually indicate current instrument and scale selected user feedback - Variety of (familiar) playing orientations (sideways like guitar, upright like cello, tabletop like drums) |
| Many sonic possibilities (experimental for musicians) | - Adjustable root note for the scale to start on - Variety of melodic & percussive sounds mapped to simple pads - Change scale and instrument to be played - Edit output sound to be more experimental than acoustic with musical parameters, like filter frequency and delay |
| Travel-size and Single or multi-player | - Ukulele-sized, with all sensors accessible by two hands (or even one) - Multiple interaction points on different parts of the instrument (neck for pitch, body top for trigger and velocity, body side for musical parameters and sound selection) |
Parts for User Interaction
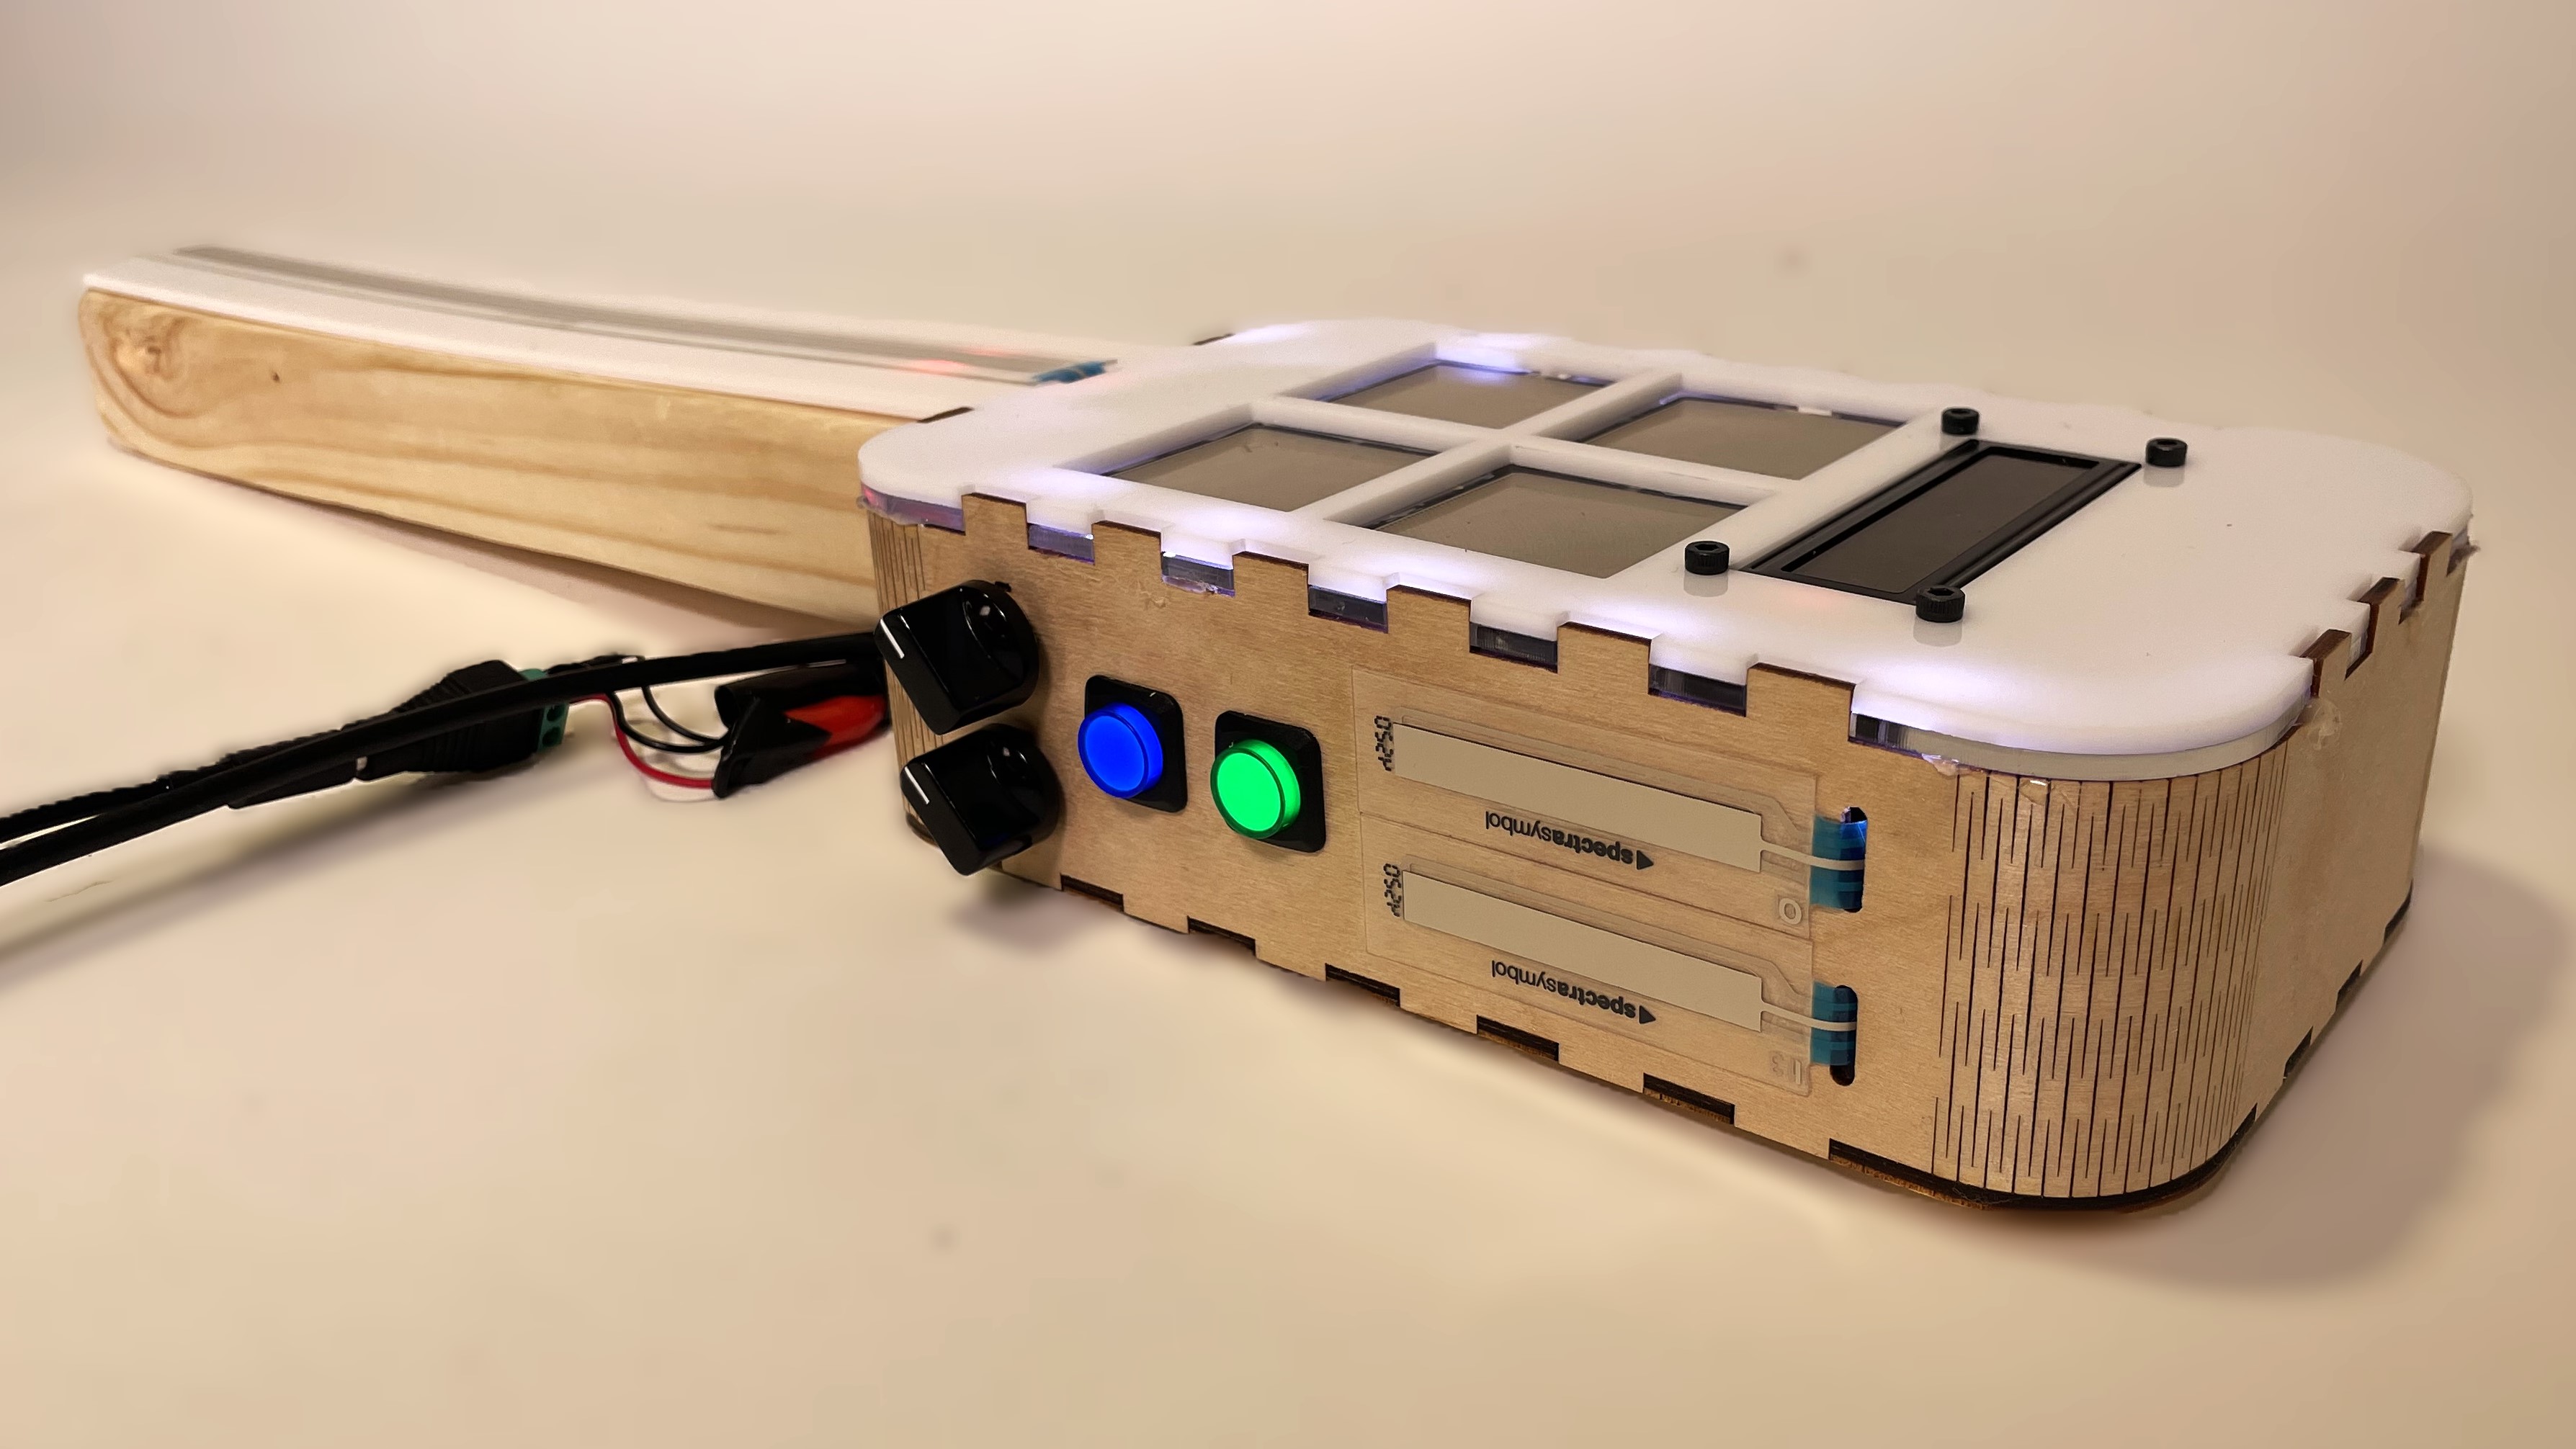
The user interface includes the parts in the image to the right. We chose to combine a wooden body with a white, LED illuminated top, and black & illuminated sensors to communicate our goal of adapting existing acoustic instruments (cello, drums) for expanded & experimental electronic playing.
See the Circuitry/Arduino section for wiring parts & details.
User Interaction Design
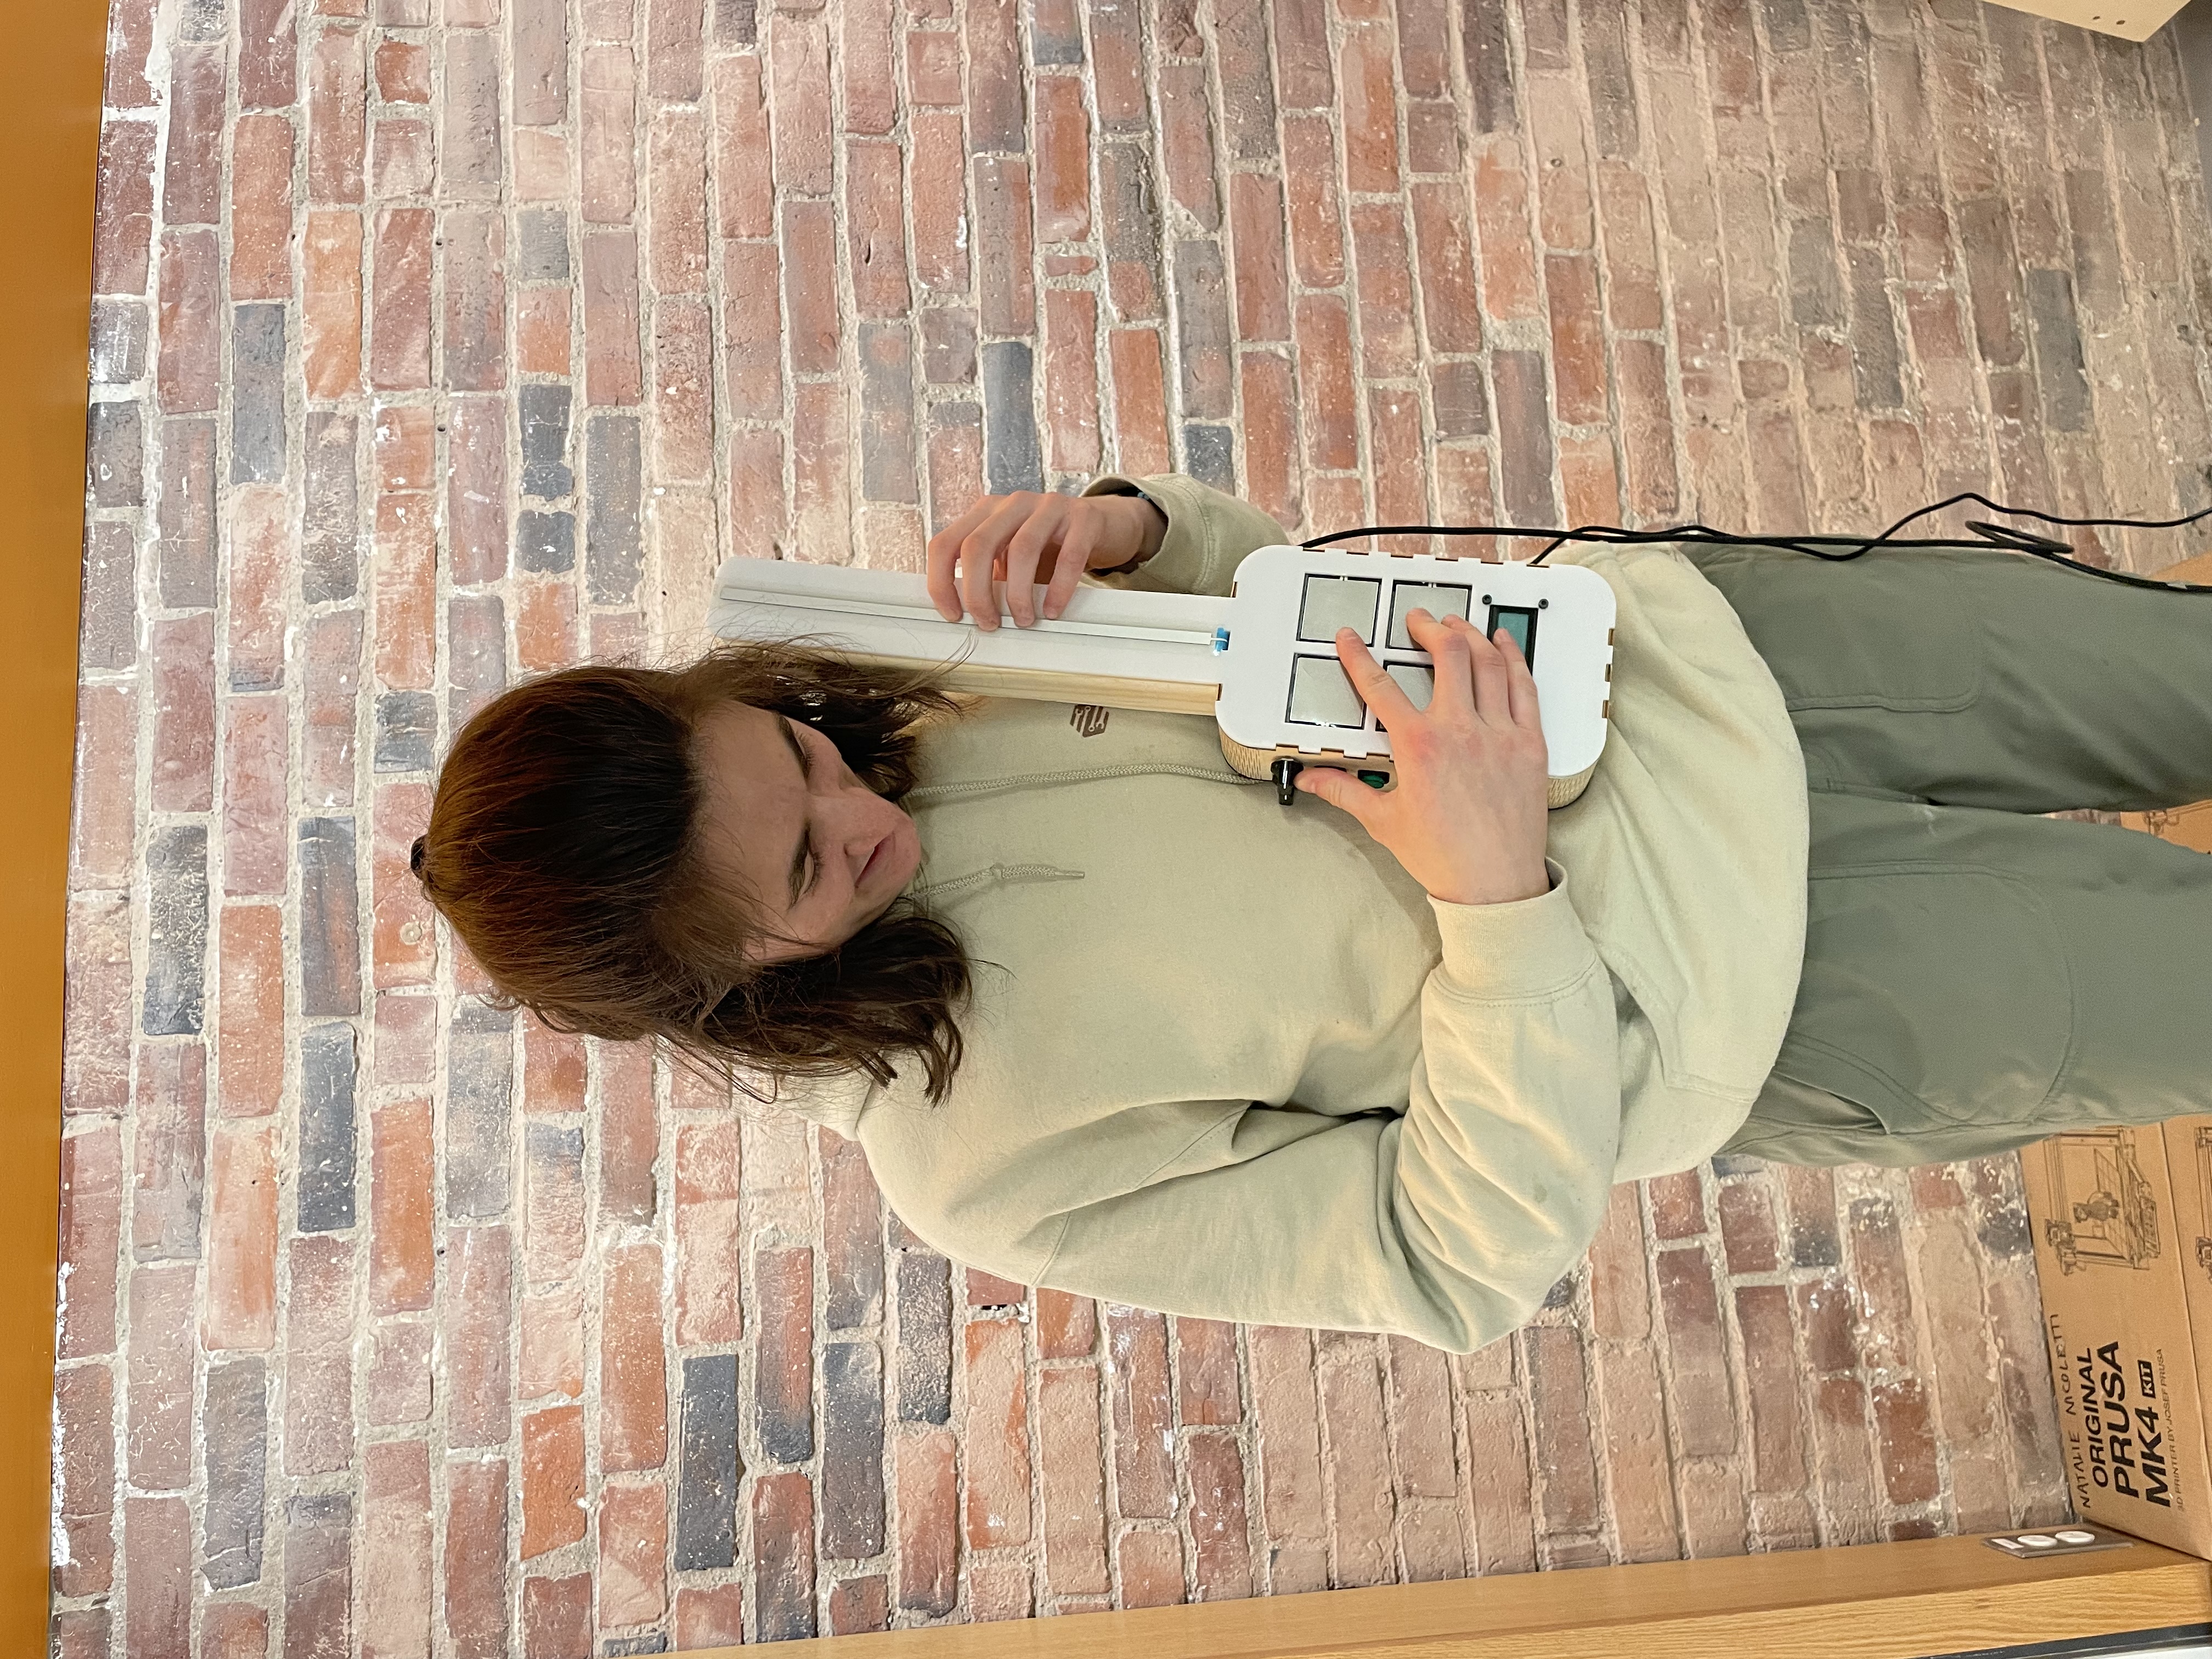
The physical form of the Sledgehammer Kablammer imitates string instruments like the cello to achieve a familiar playing interface for users, while sized like a ukulele for easy handling by one person alone (see basic dimensions below). To further enable a variety of playing orientations and multiple players, the instrument has a flat bottom and sides along with a sturdy wooden neck so it can sit on a tabletop or be held upright or sideways, with curved edges for aesthetic and safety.
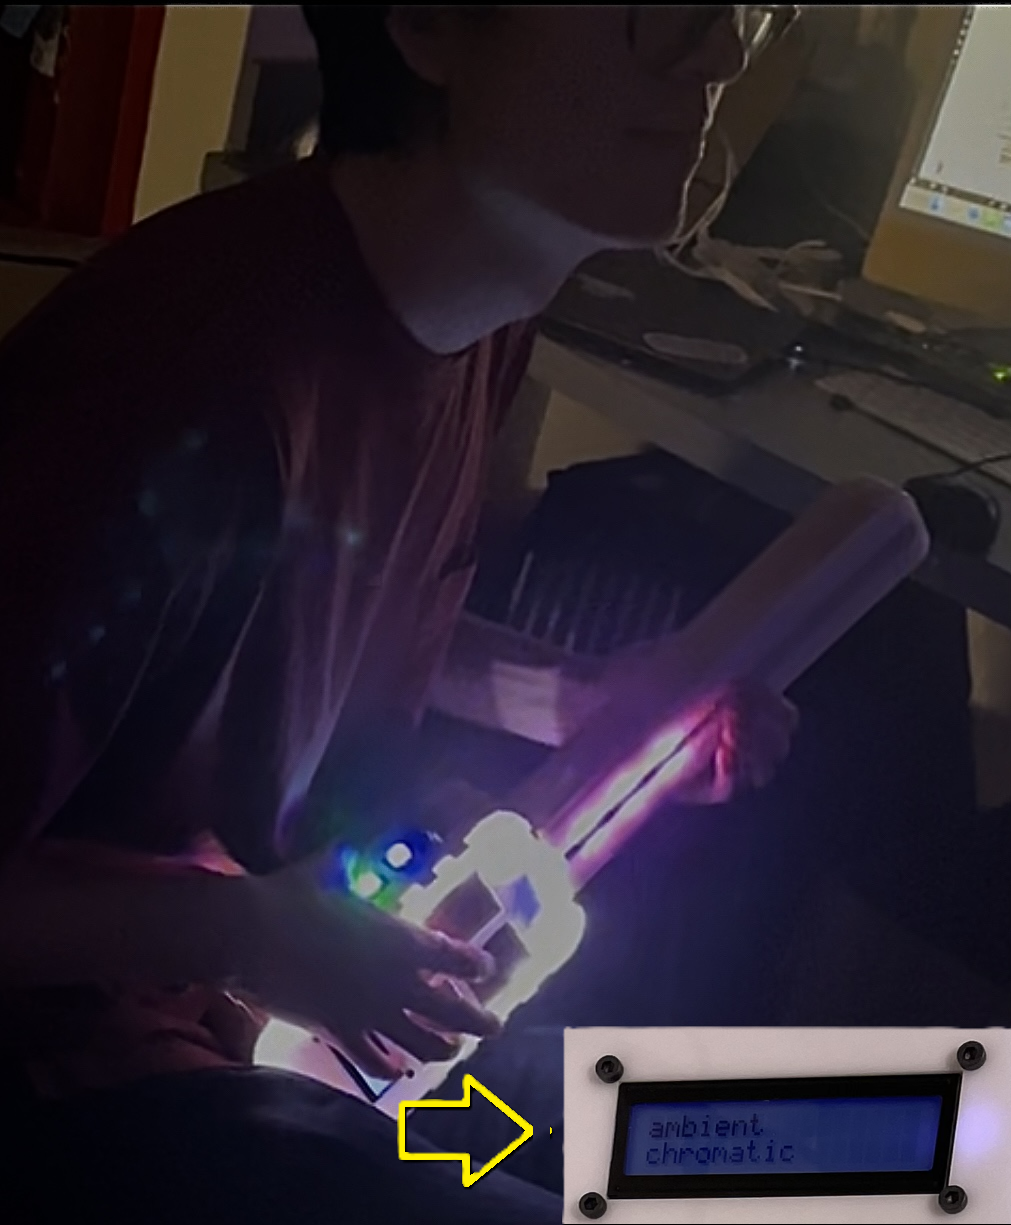
To add user feedback in a quickly digestible form, the LED strip illuminates the neck and the LCD backlight change to the color associated with the selected instrument sound, as shown to the right.
The LEDs on the neck also ‘follow’ finger position to indicate the pitch selected at any time. For further user feedback, the LCD shows text with the selected instrument sound and scale, updating immediately with the color as the player switches sound & scale.
We admittedly designed the body to our own biases as right-handed players, with pitch change by the left hand and the note-triggering pads to be played by the four right-most right-hand fingers, and the sound-parameter sensors closely & perpendicularly located to be played simultaneously by the right thumb. All sensors were selected to be triggered by a light enough touch so that the instrument takes minimal physical effort to play.
Construction
We fabricated nearly all pieces via laser cutting, as drawn to the right, to achieve the desired flat surfaces and curves (with living hinges), and because laser cutting is a rapid prototyping technique that allows for quick iterations for testing design choices/changes. The tabs on each laser cut piece allow for secure & sturdy assembly.
The only non-exposed fabricated part is the clear sub-top panel, which functions for the FSRs to sit on top of, so that they have a ‘backboard’ to be hit on while being recessed below the top panel — originally, we wanted to include rubber squares on top of the FSRs for a softer playing experience, however the material interfered with FSR performance (and did not look as great as expected), so we decided to keep it simple and eliminate the rubber FSR covers.
However, to achieve a sturdy and smooth neck as well as a pocket for the LED strips to sit within the instrument while diffusing through the top acrylic sheet, we chose to woodwork a 2x4 pine wood bar.
Nearly all electronics are packaged up inside the instrument body, as pictured in the Circuitry/Arduino section, with the exception of:
- Sensor interfaces on the instrument surfaces ➡️ secured tightly to body
- A portion of the LED strip sunk in a pocket of the wooden neck ➡️ covered by white acrylic that is ~30% transparent, the LEDs diffuse to create a glowing effect
- Two power/data cords sticking out of the neck base ➡️ Arduino power from/data to computer, external power for LED strip (avoid overloading Arduino with high-power lights)
Circuitry
The ‘brain’ of the instrument is an Arduino Mega 2560 Rev3, which has 52 digital pins (15 allowing PWM) and 16 digital pins (along with other ports we did not use) to allow for tremendous flexibility for adding sensors and other electronic components.
The main electronic components and their functions are listed below:
| Part | Function |
| Long (300mm) linear soft pot | Change pitch by sliding finger (no touch = root note) |
| 4x force-sensitive resistors (FSRs) | Trigger different melodic/percussive sounds of a chosen instrument with velocity based on force (parameter varies for some instruments) |
| 2x 8-way switch (only 4 ways used on each) | - Select instrument sound (cello, guitar, ambient, or drums) - Select scale (major, minor, chromatic, or blues) |
| 2x illuminated pushbutton | Change root note of pitch scale up or down by 1 semitone |
| 2x short linear soft pot | Change musical parameters of overall sound (i.e. delay, filter frequency, distortion for drums) by sliding finger (value is saved once finger removed) |
| Liquid crystal display (LCD) screen | Display selected instrument and scale, with colored backlight based on instrument |
| Addressable LED strip (30 LEDs) | Display color of selected instrument and illuminate finger location for pitch on neck |
To wire each main component to the Arduino and enable proper electrical standards, additional parts are necessary, with connections made either on the breadboard, with alligator clips, or via soldering.

All wiring housed inside of instrument body (image to right) is based on tutorials link in the materials spreadsheet as well as prior knowledge. A specific (clearer) electrical connections diagram is in progress.
Arduino Code
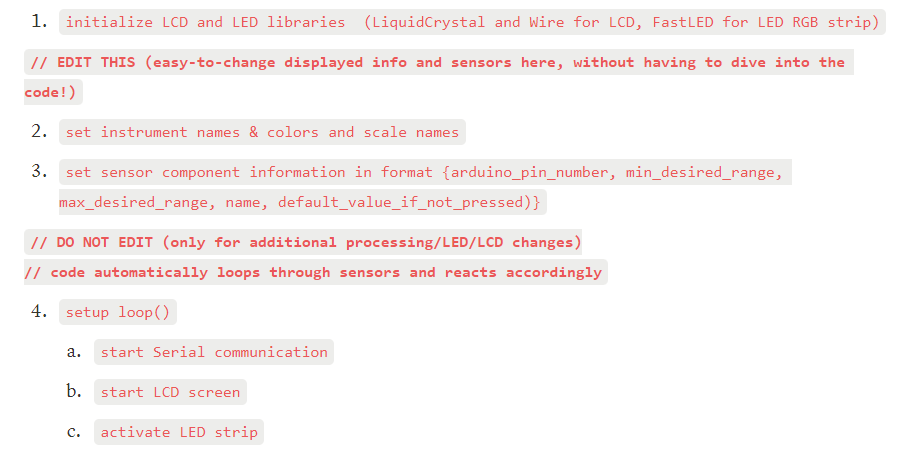
The Arduino functions as the ‘brain’ of the instrument to read and process raw data then send the values over Serial in packs to Max on the USB-connected Mac computer. The code is modular & extendable to allow for easy & quick implementation and testing of new sensors connected to the Arduino. The ‘EDIT THIS’ section at the top has simple arrays of instrument names & light colors, scale names, and electronic component information & names that designers can quickly change, then simply run the code to send to Max over Serial, without having to dive into or understand the nitty-gritty of the code below. The loop-based code takes care of reading, processing, and sending the data for you!
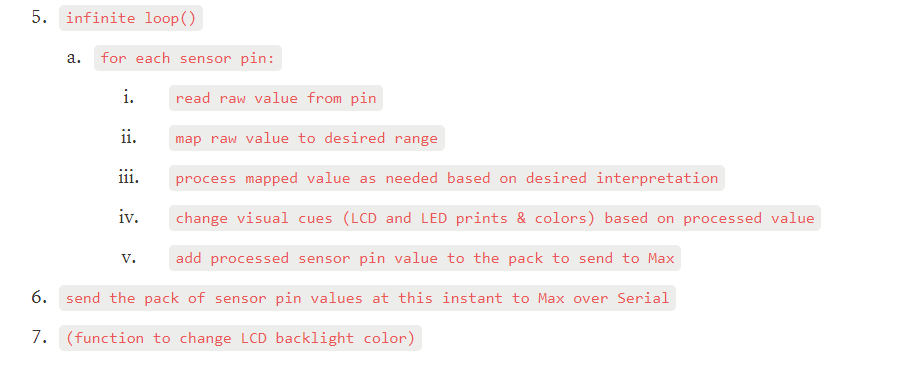
Overall Pseudocode
Below is a pseudocode (high-level, plain English) description of the Arduino (C++) code:
Max Patch
The Max patch translates processed input data from the sensors & Arduino into MIDI notes and parameters, based on the desired logic of the instrument. The main steps are as follows, which run concurrently but are listed in order for simplicity:

See the Appendix for the full Max patch (including Scale and Root Note Switch sub-functions).
Reason Rack
There are 16 modules in the Reason rack, with 15 MIDI channels all on bus A to design the sound for the musical parameters and four instrument options: cello, guitar, ambient, and drums (highlight colors align with LED colors that show when each instrument is selected).
| Module Name | Sound | MIDI Channel | |
|---|---|---|---|
| Mixer | reMIX Virtual Tec MX | Channels for 4 instruments on aux, return linked to Scream and Delay effects | N/A |
| Effect | Scream4 Sound Destruction Unit | EasyFuzz | 15 |
| Drums | Kong Drum Designer | A-A-12 -BSQ, synth snare | 5 |
| Cello | NN-19 Digital Sampler | Bowed Long | 1 |
| NN-19 Digital Sampler | Bowed Short | 2 | |
| NN-19 Digital Sampler | Pizzicato Soft | 3 | |
| NN-19 Digital Sampler | Pizzicato Hard | 4 | |
| Effect | DDL-1 Digital Delay Line | N/A (set steps based on input) | 14 |
| Guitar | NN-19 Digital Sampler | PickBass | 6 |
| NN-19 Digital Sampler | GTRODRIVE | 7 | |
| NN-19 Digital Sampler | Gtr00rvMute | 8 | |
| NN-19 Digital Sampler | HeavyGtr | 9 | |
| Ambient | Malström Graintable Synthesizer | Vesper | 10 |
| Subtractor Polyphonic Synthesizer | Dark | 11 | |
| Subtractor Polyphonic Synthesizer | JRPGVIII | 12 | |
| thor Polyphonic Synthesizer | Percutron [Run] | 13 |
The cello sounds were custom-sampled, clipped & processed in Audacity, and added to Reason by Kyle. The majority of parameters on each Reason patch were left at default, with more adjustments made on the ambient sounds. See the Appendix for screenshots of the full Reason rack.
Changes and Future Directions
The Sledgehammer Kablammer is, by itself, a complete, playable, and fun instrument; no additional changes are necessary, however several improvements could be made:
Fabrication:
- Change: Magnetized, latched, or sliding top plate for easy & secure removal/attachment to adjust wiring inside (currently hot glued on)
- Change: Smoother wooden neck with precision machined pocket for LEDs and channel for power/data cords, and bolted attachment to body
- Addition: Guitar strap for easier guitar-style playing vs. holding
- Addition: hooks/track for LED strip to stabilize in optimal illumination position
- Addition: black pads to cover FSRs cleanly with testing of physical position to not interfere with detected force signal
Max Patch
- Change: Refine parameters mapped to each sensor based on testing for actual effect on played sounds (especially ambient and drums, which have less distinct pitches)
- Addition: Make ‘presentation mode’ for cleaner and more visual cues while playing
- Change: Reorganize location(s) of data processing between Max and Arduino
Circuitry/Arduino
- Change: Replace solderless breadboard with more secure soldered protoboard, and eventually a custom PCB designed in KiCad (would also improve wire management)
- Change: Refactor the code into functions/libraries/etc. for greater readability & ease of editing
- Change: Process all pins of same 8-way switch to send only one value to Max as the switch, vs. sending all 4 pins each and processing in Max
- Addition: Learn about and implement methods of reducing latency
- Addition: Implement accelerometer to automatically change parameters or selected instrument based on orientation/movement
Reason Rack
- Change: refine sounds/parameters based on practice
- Addition: Added instruments (4/8 ways on the instrument selector switch remain empty), with additional Max gate and Arduino sensor information setup
